Плагин JavaScript для рисования и создания анимации элементов с «желейным» эффектом. Используется Canvas. Руководство по использованию + примеры.
В последнее время мы чаще видм, что WEB не использует статические квадратные элементы. Каждый день появляются все новые разработки, которые включают нерегулярные формы блоков.
В данном посте содержится информация о том, как создать фигуры с jelly-эффектом. На основе демонстрационных примеров Вы сможете создавать свои фигуры и анимировать их так, как посчитаете нужным.
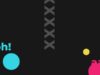
Вот один из результатов работы плагина:

Определяем код HTML, используя элементы SVG:
<!-- SVG with a pentagon path -->
<!-- Note the `display: none` style, because we don't want to show the SVG, but just get the path from JavaScript -->
<svg xmlns="http://www.w3.org/2000/svg" version="1.1" width="400" height="400" style="display: none">
    <path id="pentagon-path" d="m200 97.218 108.07 78.524-41.28 127.04h-133.58l-41.281-127.04z"/>
</svg>
Далее указываем структуру нашего блока и определяем элемент Canvas.
<div class="jelly-container">
    <!-- Canvas to draw the jelly pentagon -->
    <canvas class="jelly-canvas"></canvas>

    <!-- Text in the centroid of the jelly pentagon -->
    <div class="centroid-container">
        <div class="centroid-text">S</div>
    </div>
</div>
Добавляем базовые стили к нашим блокам:
/* General styles */

html, body {
  margin: 0;
}

body {
  background-color: #D98327;
  overflow: hidden;
}

/* Jelly styles */

.jelly-container {
  position: relative;
  display: inline-block;
  left: 50%;
  margin-left: -200px;
}

.jelly-container, .jelly-canvas {
  width: 400px;
  height: 400px;
}

/* It's important to position the `.centroid-container` in the top-left corner
   This way the `.centroid-text` will be positioned in the center (with JavaScript) */
.centroid-container {
  position: absolute;
  left: 0;
  top: 0;
  transform: translate(-50%, -50%);
  pointer-events: none;
}

.centroid-text {
  font-size: 100px;
  color: white;
}
Устанавливаем опции плагина и создаем сам jelly-эффект:
/* Setup options */

var options = {
    paths: '#pentagon-path',     // Shape we want to draw
    pointsNumber: 10,            // Number of points
    maxDistance: 70,             // Max distance among points
    color: '#5C1523',
    centroid: '.centroid-text'   // Element to move accordingly with the centroid of the shape
    // debug: true               // Uncomment this to see the points
};

/* Initializing jelly */

var jelly = new Jelly('.jelly-canvas', options);
Реализация перетаскивания блока:
/* Setup options */

var options = {
    paths: '#pentagon-path',     // Shape we want to draw
    pointsNumber: 10,            // Number of points
    maxDistance: 70,             // Max distance among points
    color: '#5C1523',
    centroid: '.centroid-text'   // Element to move accordingly with the centroid of the shape
    // debug: true               // Uncomment this to see the points
};

/* Initializing jelly */

var jelly = new Jelly('.jelly-canvas', options);
/* Drag and drop */

var startX, startY, dx, dy, endX = 0, endY = 0, x = 0, y = 0, lastX = 0, lastY = 0;
var down = false;
// This will be the max distance for shaking
var shakeLimit = 5;

container.addEventListener('mousedown', function (e) {
    if (hoverIndex >= 0) {
        startX = e.clientX;
        startY = e.clientY;
        down = true;
    }
});

document.addEventListener('mousemove', function (e) {
    if (down) {
        x = e.clientX - startX;
        y = e.clientY - startY;
        container.style.transform = 'translate(' + (endX + x) + 'px, ' + (endY + y) + 'px)';

        dx = x - lastX;
        dy = y - lastY;
        if (dx > shakeLimit || dx < - shakeLimit) dx = dx < 0 ? - shakeLimit : shakeLimit;
        if (dy > shakeLimit || dy < - shakeLimit) dy = dy < 0 ? - shakeLimit : shakeLimit;

        // The `shake` function will "move" the half of the points (alternately) the distance defined
        jelly.shake({x: - dx, y: - dy});

        lastX = x;
        lastY = y;
    }
});

function mouseUp() {
    if (down) {
        down = false;
        endX += x;
        endY += y;
    }
}

document.addEventListener('mouseup', mouseUp);

document.addEventListener('mouseout', function (e) {
    if (e.target.nodeName == 'HTML') {
        mouseUp();
    }
});
Вот и вся магия. Что касается поддержки кроссбраузерности, то здесь все шикарно. Элементы корректно отображаются во всех популярных обозревателях. Однако производительность будет зависеть от железа пользователя и его операционной системы.
Скачать файлы плагина можно по ссылке выше. Подробное руководство в оригинале можно найти на страничке Github проекта.